Pulawski's elegant gull-winged fighter is a shape that has
evaded the abilities of kit manufacturers for years.
Happily, Mirage has taken a quantum leap forward in
capturing this complex aircraft in model form with the release of their
trio of 1/48th scale kits. \
Complete with both resin, photoetch and an instrument
panel film, any modeler wll be able to build a great 1/48th scale P.11c
straight out of the box. Starting at $19.95 from Squadron, it's a bargain.
I recommend buying several.
Here is my detailed review, a combined In Box/Tape
Together/Comparison to the LTD kit and some notes on the old Gary Atlee
detail set ofr the LTD kit. At the time of writing this review i had just
started planning and building the kit. I include some cautionary notes and
suggestions from my examination of the kit parts and work done to date to
help modelers build the kit. As a bonus, I included what I know about the
history of the kit and the additional aftermarket goodies to come.
The Three Kit Versions
-
48-101 Fighter version with
photo-etch and resin radiator. Markings: S.Skalski's "White 64" 141 "Wild
Ducks" Eskadra and H.Dudwal's famed "White 10" ( See Note to Follow) of
113 "Owl" Eskadra
-
48-102 Fighter-Bomber version
with photoetch, resin radiator and four exquisite slender resin 12.5 kg
bombs. Markings: "White 2" 121 "Winged Arrow" Eskadra ( the markings for
the sole remaining P.11c now in the Krakow Air Museum's collection ) and
T.Sawicz's / A.Gabszewicz's "White 4" 114 Swallow" Eskadra.
-
48-103 Fighter version with
photo-etch and resin radiator. Markings: Romanian Air Force "White 315"
Escadrille 49 Bucharest-Banessa Aerodrome, 1942 and a curious one-off
Polish machine, "White 3", of the Pursuit Brigade in based in Warsaw
during the September Campaign with a test camouflage consisting of a
splinter scheme of dark green over Polish Khaki.
The Box Art
For decades the box art on kits has inspired young and old
modelers alike to buy the kit and build it. For a time the evil lawyers
demanded that the "truth-in- advertisement' rules ( there's an oxymoron !)
dictated that only a photos of the actual model was acceptable. Hopefully
we have the end of that bid of litigouis madness.Happily, the Mirage P.11c
kit box art is some of the best in the hobby.
48-101 depicts Dudwal's "White 10" 113 Eskadra after completing a
successful head-on firing pass on a bullet-riddled He-111 coded 5J + CN.
Two things are brought out in the illustration. The Luftwaffe first
learned of the defensive weakness of the He-111 in combat in the skies
over Poland. The second thing is that Polish pilots flying the relatively
slow P.11c often could only resort to two types of attack - head-on, or
diving from a greater altitude to catch their more speedy opponents. The
one possible error is that "White 10" is depicted as a 4-gun P.11c, when
the instructions state that it was a late production gunless-wing version.
48-102 shows the Krakow Museum 121 Eskadra "White 2" after a bombing
attack on a Wehrmacht truck convoy - the Polish 12.5 kg bombs perhaps
wreaking more havoc than they were really capable of, but, dramatic,
neverthless. "White 2" may have been flown by Wladek Gnys's squadron mate
and friend, W.Krol.
48-103 has two Romanian P.11c's circa 1942 in a staggered formation with
the lead machine in the background already peeling off to either turn to
port or commence a diving attack. The kit's "White 315" is in a shallow
dive prominent in the foreground and, although it appears just about to
heel over to follow the leader, its pilot is actually looking down to
starboard, so when he returns to a forward view, he's going to be in for a
bit of a suprise, since his leader is not going to be there!
The Instruction Sheets
The instruction sheets for all three kits have standard
assembly instructions noting the differences found on P.11c's, namely
whether they were four-gun versions, early two-gun versions or late
production two-gun versions, whether they had a radio fitted and, finally,
whether they had wing racks for bombs ( I thought that they all had this
capability). Lack of radios and aircraft machine guns plagued the Polish
Air Force (PAF) for years. The information on the individual markings in
each kit tell you what equipment was fitted for each aircraft, who flew
the aircraft, whether some markings remain unknown or undefined ( in which
case, both versions of markings are supplied) and, finally, whether there
was a variation between pre-war markings ( for instance white underwing
buzz numbers for pre-August 1939 and black from August 1939 on). The
research that went into the kits is superb - Bill Bosworth/Accurate
Minitaures quality - and the contributors's names are noted, as are the
modeling/aviation references. The sheets are in English, as well as
Polish. As with any kit instruction sheet, I strongly advise that even the
most seasoned modeler take time to thoroughly read it - with these kits
it's even more important. One example is their correctly telling modelers
to leave the gap in between the horizontal stabs and the fuselage alone -
do not fill it. The instructions also show how the modeler can add certain
items, such as sprue or wire here and there, which will enable a modeler
competing in U.S. IPMS contests to stay within the rules for "Out-of-theBox",
while adding such detail. One minor mystery is an un-numbered part next to
the rear cockpit bulkhead part no. 17. The un-numbered part is a backing
plate on which to mount the the PE / film instrument panel. It also not
listed in the instructions.
The sheets have a mix formula for the paints using Humbrol - FS 30118 for
a faded version of Khaki - 100% Humbrol H142 - Matt Field Drab ( there's a
typo on the sheet listing it as H124, which can't be correct, as this
color is Satin Petrol Blue) or the non-faded areas FS 30118/20122 - a mix
of 92% H142 -Matt Field Brown- and 8% H163 - Dark Green. The Light Blue
underside color is matched to FS 35526 and the Humbrol mix is 90% H130 -
White and 10% H89 - Matt Middle Blue. The only problem is that Humbrol
H142 is not generall available through U.S. distributors, according to my
hobby sources. U.S. modelers may have to get this color from off-shore
sources. These colors were identified during the restoration work on the
Krakow P.11c. Like most preserved aircraft it had been repainted a number
of times. Using similar techniques that the NASM uses, the restoration
staff believe that they found unweathered examples of both colors in
between join surfaces of parts. Polish aviation enthusiasts shared this
information with me back in 1989 and even sent me some scrapings, when I
was coordinating the series of 50th Anniversary Exhibits sponsored by the
Intrepid Sea-Air-Space Museum, the first entitled, "Poland Invaded". One
of the artifacts lent to the Intrepid was an original section of
corrugated skin from a PZL. Underneath the repainted surfaces one could
see weathered portion of the original Polish Khaki and on the join
surfaces, the unweathered darker example basically resembling a very
brownish shade of Olive Drab. Ironically, the Krakow example, when
repainted, came out a bit too green in cast.
When I built the models for the 1989 exhibit, I mixed a batch using the
older Polly S line, which had a number of richer warmer colors than the
current Polly Scale Line. I have some of my original batch of Polly S mix
for Polish Khaki, which still seems serviceable. A few years back, when my
brother built the old LTD P.11c kit, I helped him mix Polish Khaki from
Model Master using 60% German Panzer Chocolate Brown (Schokoladenbraun)
Testors # 2096 about 35% of RLM 81 Braunviolet Testors # 2090 with about
8-10 drops of insignia red and the balance, about 5-6 drops of a dark
blue. My brother Ron commented on how much this particular mix changes
with different lighting - which kind of reminds me of the peculiar
chameleon nature of Polish Khaki. The Polish Light Blue can be mixed using
RLM 65 Helblau as a base with a bit more dark blue and a drop of gray or
black. Although some modelers like using RLM 76 as the base color, I would
not suggest it. Interiors of most P.11's were painted in a silver lacquer,
a sample of which I was also sent back in 1989. Recent information has
surfaced that some might have received a light gray finish, but silver
lacquer/aluminum is the dominant choice for the interior. Follow the color
guides on the instruction sheets for detail painting.
By my count, the kit includes 49 plastic parts, 39 PE
parts and 1 resin part ( radiator ) in 48-101 & 48-103 and 5 resin parts
(1 radiator & 4 bombs ) in 48-102.
Taken in turn, the plastic parts are molded in light gray plastic, so dear
to the hearts of pre-shaders, on 2 trees ( sprues).
Accuracy
Measuring out the main kit parts against published
dimensions and the drawings in the AJ Press P.11 monographs, it appears to
be spot-on, within .25mm in most cases, and that may be due to my ruler
being worn down a little. The wingspan is 35 ft. - 2in.( 10.72m), as it
should be, and the length of the fuselage is 24 ft. - 9 1/4 in. (7.55m),
as far as I can tell by just putting the unbuilt parts "together" with
tape. It is light years ahead of the LTD kit, which suffered from a myriad
of problems, including wing shape ( incorrect center section ) and size
with the chord being too short by at least 2mm, the fuselage on the old
kit was 2mm too long and the nose section was horribly shaped, the prop
was terrible and the wheels were too small by 2 mm, just to name some of
the problems. Mirage has taken care to correct all of these errors and
then gone several steps forward.
|
|
|
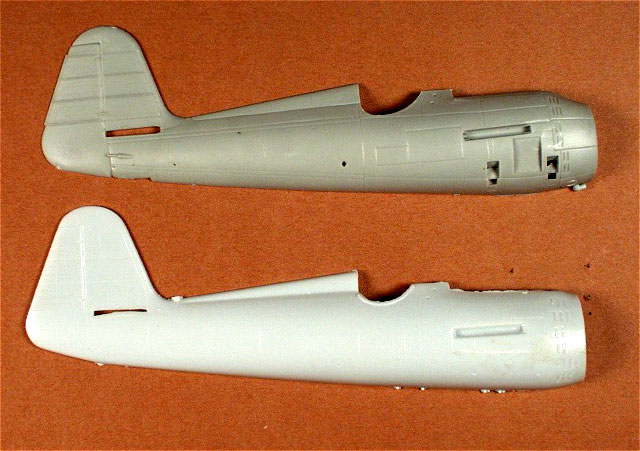
Comparison of LTD ( light gray
plastic ) and Mirage ( darker gray plastic ) fuselages |
The corrugations are finely executed and the rest of the panel lines are
all engraved and nicely rendered, for the most part. Some Polish modelers
have commented on the inaccuracy of some of the panel lines. A comparison
to the drawings in the AJ Press books only reveals that the problems, if
any ( I don't see it) are not even worth mentioning in my opinion,
although I understand that even more information has surfaced on the
panels lines and other P.11c details ( tail skid, for instance), since
these books were issued. Correcting any panel lines would be difficult, as
it may lead to wiping out some of the fine corrugations engraved. I
recommend leaving well-enough alone. I understand that a new set of P11.c
drawings will be coming out shortly in a Polish hobby magazine, which
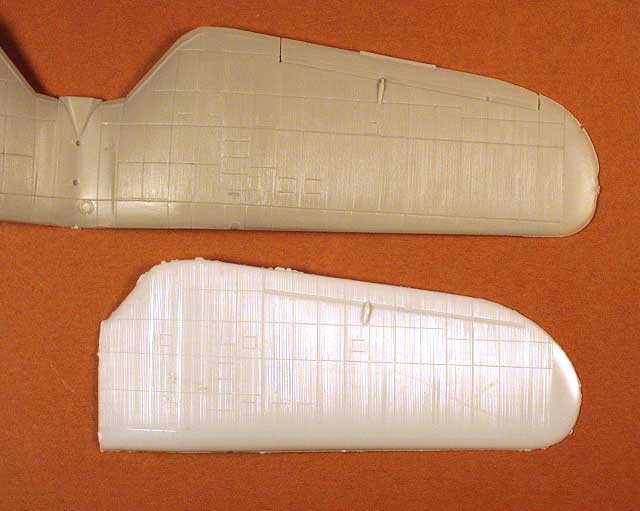
incorporate alot of new and corrected information. The ribs on both the
lower wing panels and the fin and rudder appear to be a bit too pronounced
when comparing them to photos of the sole remaining P11.c in Krakow. If
I'm correct, a pass with 600 grit sandpaper is all that's needed to
slightly reduce them. Judge for yourself on the latter, before going ape
s#*t with with the sandpaper.
|
|
|
Comparison of LTD ( light
gray plastic ) and Mirage ( darker gray plastic ) top wings. |
The location of items, struts, ejection fairings, etc., on
the underside of the wing are clearly marked with smooth areas on the
corrugated surface.
Engineering and Kit Parts
Mirage wisely molded the upper wing in one piece, which
will go a long way in preventing the type of problem I noticed on many
P.11 kits built, especially the LTD kit - namely the dreaded bird-like
"flapping wing" effect, usually frozen in the down stroke. The center
section of the upper wing is particularly well-molded to match the
original.
I noticed that the wing tips will require some repair
where they are detached from the sprue.
The fuselage nicely captures the very complex curves of
the nose, the gun troughs are well defined and the gear and wing strut
location holes are nicely done. One area that could have been done better
are the louvers on the nose. They should be deeper and more defined. The
surface finish of the fuselage in all other respects is great - the
molding very crisp.
There is a small sink hole on the underside of the nose on
a fuselage half of one of the kits I received, but it is not on the other
kit. In dry fitting the fuselage halves together I noted that they were
off-center for two reasons - the locating pins/holes mis-match were a
problem and there was some flash on the join surface . A half a minute is
all that is needed to trim the locating pins and sand the join surface of
two fuselage halves - good advice for most kits, by the way. Once you got
the fuselage halves together and sanded, I recommend scribing the oval
outline of the bottom of the jettisonable fuel tank on the underside of
the fuselage. Most photos show that there was quite a gap there, so make
it deep and give it a wash. l like how Mirage provided the cut-out for the
Pulawski landing gear spring-rod actuation just forward of the tank
outline. Some thought might have to given to blanking off the see-though
effect in this area, however, depending upon how "IPMS judge-aware" you
are ( I'm one! ).
Although at the time of the review, I have yet to assemble
the cockpit and install it into the fuselage, the same issue may have to
be addressed to avoid the see-through problem when looking forward into
the cockpit.
Click the thumbnails below to view larger
images of kit sprues:
Dry fitting the upper wing/ lower wing assembly to the
fuselage, you'll notice the love and care put into the engineering of this
part of the kit. On the lower surface of the top wing, there is a
triangular projection on the center of the leading edge, which facilitates
properly blending the assembly together. The only problem is that there is
a step from the lower wing panels to both this projection and the
fuselage, which will have to be corrected. Before completely gluing the
wing to the fuselage, some thought will have to given to ensuring that the
winscreen sill area on the fuselage is sufficiently spread to match the
underside of the windscreen before gluing the the front of the cockpit
sill area to the trinagular projection at the trailing edge of the center
section of the top wing molding, less you wing up with a repair job - an
ounce of prevention being the key theme here. It is possible that the
mysterious part ( instrument panel mounting plate ) on the tree next to
part no. 17 might serve as a sufficient "spreader" bar to prevent any
problems there, but I have not tested the assembly as of this writing.
The smaller plastic parts are nicely done, with just a few minor
exceptions. Modelers will note that the instructions tell you to use parts
22B and 23B for the tear-drop shaped shell ejection chute fairings, which
have the notch on the opening for both undersides of the wing facing to
port. The kit also provides two more 24B and 25B that face starboard.
After checking with several Polish aviation/modeling enthusiasts, it turns
out that the instructions are correct - they should both face port, since
the guns were not handed - left and right. I undestand that the original
mold designer did not have an answer in time to make the decision, so,
Mirage simply provided both left and right hand versions, hoping that
answer would come, but they did not want to hold up production of the kit
- now that's thoughtful. I have also been told by another Polish modeler
that the wing stuts may be 1.5mm too short, although I have not
test-fitted them, yet, myself. These gentlemen have also hinted that the
location of the radiator on the starboard side of the fuselage may be off
a bit. Let's see what the new drawings will show, but, this will take some
work to correct, given the prominent molding of the opening for the
radiator on the starboard fuselage.
In another "first", Mirage's engineering on the spinner and prop finally
captures these shapes.
|
|
|
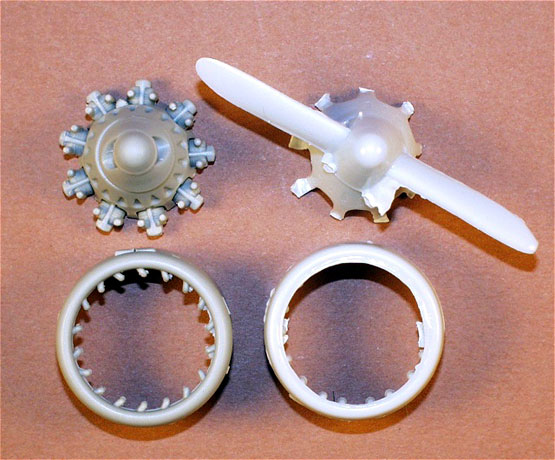
Comparison of Mirage
cowl parts (darker gray plastic) on left
and LTD parts (light gray plastic) on right
(Note: off-center placement of Mirage parts is my fault and not a
flaw in the kit) |
It is the unique design of the rear of the spinner that
makes this possible. I would suggest tacking the cap onto the rear half of
the spinner without the prop installed to lightly sand these to blend the
perfect cone. Pop it apart and then install the prop. The forward engine
fairing is not too bad, but the cooling slots scream out for drilling.
Check photos and drawings to do this properly. The cowling and forward
engine cooling ring are serviceable and the Bristol Mercury is adequate.
Modelers will have to add the engine cowling support strut/wires so
prominent in photos and drawings. The fairing, cowling, engine and cooling
ring will require some trimming and adjustment, as the rear of the conical
fairing does not quite reach the forward end of the fuselage when
installed over the Merc - the problem being the front projection on the
Merc, itself - keep trimming till it fits. I would aslo suggest tacking
together the front collector ring and cowling panels and giving them a
pass with the sand paper to blend the shape, as there is a bit of a mold
line around the back of the cooling ring. Also, remove the nubs from
inside the cowling panel halves. I would have prefered separate push rods
for the Merc, but very little of the front of the engine is visible once
the conical engine fairing is in place. I also checked out the "Engines
and Things" Bristol Mercury nad some trimming will be required to allow
fitting of this after-market item, although it does provide the age parts
on the engine/cowling assembly to the LTD parts once again proves how
superior the Mirage kit is.
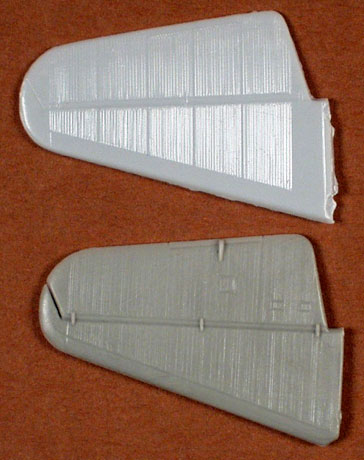 Rounding
out the "small bits", the wheels are the proper diameter - some clean-up
will be necessary on the areas where they are detached from the sprues..
The horizontal stabs are as good as the wings.
The pitot shape is slightly different than that on most
photos. The kit has two cones of almost equal size. On the real McCoy the
front cone is smaller than the rear cone on the venturi. Modelers may also
want to add the tube projecting out of the front cone, as well as, the
curved connecting tube from the front cone to the fuselage.
The other small parts are pretty good right out of the
box, including the guns, tail skid, etc. It's up to the modeler how far he
wants to improve on the kit parts.
The clear windscreen is thin and well molded. Although the
kit parts are pretty good, I would replace the handhold handles in front
of the cockpit with wire.
Interior, Photo-etch and Resin Parts
The kits provide enough plastic, resin, PE and film to
fashion a very respectable "busy-looking" interior straight out of the
box. There is a very annoying nub on the cockpit floor that I had a devil
of a time removing while not damaging the surrounding surfaces.
The seat and rear bulkhead one-piece molding from the Gary
Atlee detail set that was made for the LTD kit fits in the Mirage kit, if
anyone cares, although I would not prefer to use the rest of the Atlee
cockpit, which is no longer available.
The PE provided by Techmod in the kit is mostly for the
interior, with the rest of the items allowing very detailed wing bomb
racks, fuselage inspection panels, the strap holding the jettisonable
fuselage fuel tank, two different gunsights and a bead sight, radio aerial
mounts, airleron hinges, frames for handhold/foothold kickplates, etc.
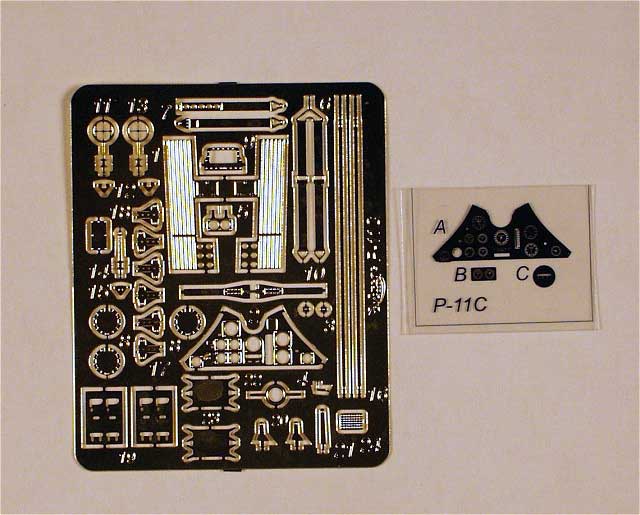
The PE is somewhat softer than usual fare and care must be
taken not to bend parts while working with them. The instrument panel PE
is great, as is the film for the instruments. Also provided on the fret
are the two pull-rod knobs, part No.PE3 - paint them yellow. I have
questioned the accuracy of the red face on the uppermost left-side
instrument, but apparently, it is highly probable that some of the
Gerlach-made instruments had color faces. The insturctions tell you to
paint the back of the film in flourescent paint - it will be tricky just
trying to paint the numbers and needles flourescent, while leaving the
rest of thethe dial faces in red. The one PE part that does not work well
is the landing strut spring rods. This should be replaced with either a
flattened and shaped metal wire or the PE part should be superglued to
plastic flat strip and sanded to render a slightly more substantial
thicker part.
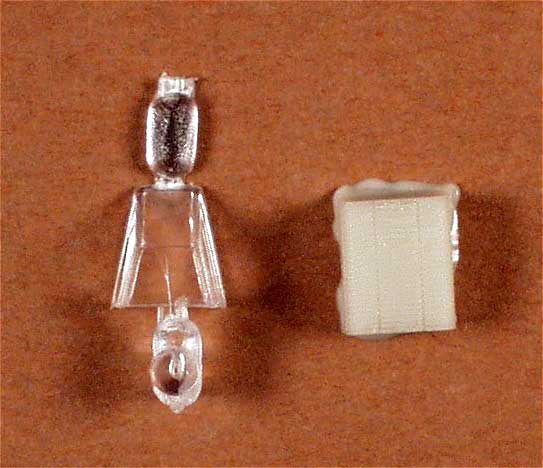
Kit Nos 48-101 and 48-103 come with one resin part - the radiator, which
although nicely molded, is an item that is better rendered from PE.
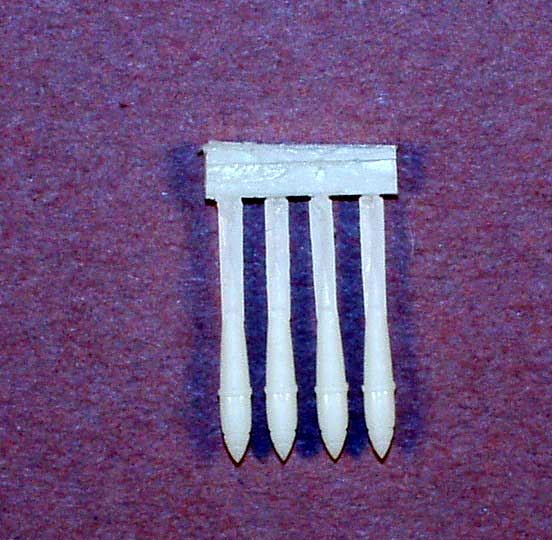
48-102 adds in four exquisitely molded Polish 12.5kg
bombs, an elegant slender design that will really look nifty mounted to a
bantam-weight P.11c fighter-bomber.
Accounts from the September Campaign are replete with
stories of Polish pilots bravely attacking German ground targets and the
losses they suffered in the process.
Decals
Although I have not tested them, the Techmod decals
provided in the kits are well-printed, in register and by all accounts, go
down nicely. The careful research done by Polish aviation historians
really shows up on the sheets. They have incoporated alot of new
information recently confirmed and for the items that are still somewhat
in doubt, they give you a choice of variations - that's a quality kit
manufacturer.
Click the thumbnails below to view larger
images:
|
|

|
|
Decal sheet for kit 48-101
|
|

|
|
Decal sheet for kit 48-102
|
|

|
|
Decal sheet for kit 48-103
|
|
|
-
48-101 provides the 113 Eskadra
Owl insignia on a Light Blue triangular badge, per the more recent Polish
research. For years we thought that all of these badges were on a white
background. New on tis sheet, though, is a choice of either White or Light
Blue for the "No.10" for Dudwal's machine. Both Black and White underwing
"buzz numbers" are provided - White being pre-August 1939, and the Black,
August 1939 and after. Skalski's P.11c is presented as No. 64, rather than
the previous popular No.66 always identified with Skalski, whom I met and
got really plastered with back in 1989. The sheet generously provides a
full set of PZL font serial numbers in a choice of red, white and black to
facilitate building other aircraft. Both the P.11c designator and the PZL
factory symbol for the fin is included, but modelers are cautioned to not
robotically add the latter, as it did not appear on alot of P.11's - check
photos first ! Added bonuses include the weight table for the starboard
side of the rudder and the prop decals, the first time this has been
offered.
-
48-102 provides both versions of
the 114 Eskadra Badge with the black swallow, one on a White triangle, the
other on a Light Blue triangle. Sawicz, another Polish pilot I met, who
flew "White 4", believes the 114 Eskadra badge was White, while most of
the latest indications hint that it was Light Blue. The comments regarding
the other details on sheet 48-101 apply to 48-102 & 103.
-
48-103, of course, provides the
Romanian markings, described earlier, as well as, the experimental Polish
camouflaged "White 3".
About the only thing still useful from the LTD kit is the
Gnys markings for "White 5" from 121 Eskadra, however, the accuracy of
these markings has been the subject of some doubt lately, given the lack
of confirming photographs for his aircraft tying together aircraft number,
"buzz number" serial number, and general markings with the pilot in
question. Even his claim for having obtained the first allied air-to-air
kill now has more competition than ever from other Polish fighter pilots,
whose claims are starting to hold a bit more water they have in the past.
Evolution and History of the Kit
|
For U.S.and International modelers privy to the "history"
behind the evolution of Accurate Minitaures kits, the story behind
Mirage's PZL P.11c is just as fascinating. This is what I have been able
to piece together from both people at Mirage and other Polish modelers.
As I stated earlier, Polish hobbyists, in general, and
Polish model manufacturers, in particular, wanted an accurate PZL P11.c
kit. Nobody, in any scale or media, had come close to capturing the
complex shape of Pulawski's elegant, almost art deco, gull-winged fighter.
The complex design, combined with the corrugated surfaces, was,
admittedly, a daunting task. Broplan's 1/48th scale vacuform PZL P.7 and
P.11a came the closest, and remain the best of these variants to date in
any scale. But, these kits have their own problems. All other kits
required major surgery to just about all parts and dimensions. Both
Techmod and Mirage had started work independently on molds for a 1/48th
scale P.11c kit awhile back. There was, and continues to be a relationship
between the two companies. At some point in time it was decided to
continue with the Techmod mold, and combine their deisgn to Mirage's
experience in marketing plastic kits (Mirage is also the distributor of
Hasegawa in Poland). Before the deal was struck, Mirage performed the
usual market research to see if a P.11c kit would be a successful product
and a positive enough response was received to cement the deal between
Techmod and Mirage about a year ago. Although Mirage's own P.11c design
was quite complete in CAD design, Mr.Zielinski, Mirage's owner, decided
that since Techmod's actual mold was already advanced that Mirage's CAD
plans would be shelved and the Techmod mold would be the vehicle.
Mirage had started their own design based on painstakingly detailed study
of the existing P.11c in Krakow. There are no known original set of
original blueprint drawings for this PZL fighter and the sole remaining
P.11c is not complete in its original equipment. For instance, the current
wheels are replacement items that are smaller than those on the original
and some instruments are merely approximates. They supplemented their own
research with that of other Polish aviation experts. Some of the topics of
discussion included wing cross sections, location of fuel caps, radio
equipment and antennas.
On the Mirage staff, Piotr Mrozowski was one of the key people driving the
research, the attention to detail and lobbying for improvements prior to
release - a kind of Polish Bill Bosworth. Some of the improvements added
along the way, especially the last 3 months, include revision and
straightening of some panels lines, rework of the cowling/engine assembly
and replacing some original plastic items with improved multi-media
substitutes - the resin radiator being one of them. Other improvements
deemed of marginal gain or prohibitive cost were shelved. Mirage
cooperated with Techmod in producing the PE fret designed by a Tomasz
Gronczewski (according to my information), which bears the Techmod label,
but the resin parts are Mirage's contribution.
Mirage also lavished their attention on the informative instruction sheet,
research of the camouflage schemes and markings, all of which resulted in
the beautiful Techmod decal sheets in the kits - a true labor of love of a
number of people. Key Polish avaition experts and modelers including, but
probably not llimited to Cynk, Glass, Kopanski, Morgala, Szewczyk,
Witkowski, Grabowski, pored over the existing photos, drawings, reports,
interviews with original Polish pilots and scale drawings to give the
modeling world the most accurate information possible. "Thanks, everybody
!"
I have heard also that, despite all of their great work, Mirage was still
not 100% happy with the kits, and I think that this is a good thing, which
augers well for the modeling community. Any model company that is not
satisfied is a company that wants to strive for bigger and better
accomplishments. I already hear that they are applying the same
professionalism in planning and designing their PZL P.23 Karas, which
originally was to be released prior to the P.11c kit. I understand that
the main sprues are done and the clear parts are being worked on. I loved
the Lublin R XIII's I built more than 13 eyars ago.
I love the P.11c kits and I, for one, can't wait for the
next product out of Mirage. If I have left anyone's name unmentioned or if
anyone has comments on details of the evolution of the Mirage PZL P.11c
kit please feel free to make corrections in the Hyperscale forum.
To Mr. Zielinski and all those who worked on the P11.c
kit: "Well done, gents !!"
Aftermarket Products on the Horizon
|
Rumors of goodies to come include at least two Polish
companies and a U.S. based operation. From the Polish company ( the name,
for which, I choose not to reveal), a complete upgrade containing a
entirely new engine assembly, together with a positionable PE cowling and
a combined resin/PE interior set and open wing gun bays. Those modelers
lucky enough to possess the old Gary Atlee detail set for the LTD kit,
still have at least two useful parts, the control stick and the
strut-mounted gun camera. The resin and PE sets to come will probably make
the Gary Atlee product superfluous.
It seems to me that the Polish PE company, PART, could take the "down and
dirty route" of simply releasing a 1/48th scale version of their 1/72nd
scale fret originally released for the Heller kit. Perhaps, all the parts
would not fit, but the interior parts and the multi-frame radiator would
be welcome additions. Rumor also has it that Tomasz Groczewski is
designing a purpose-built expanded PE fret for the Mirage kit, which will
be marketed by Techmod.
Rumors also have Techmod preparing a release of additional decal(s) on
thier own to supplement those in the kits. The markings rumored include:
-
48-057 "10" 161Eskadra K.O.P. (
Frontier Guards ), Spring 1939; "4" 161 Eskadra K.O.P Lt.Jan Dzownek,
Spring 1939; "11" 131 eskadra; "8" 113 Eskadra Late 1938
-
48-058 "9" 161 Eskadra 1939;
"65" 142 Eskadra s/n 8.25; "1" 112 Eskadra s/n 8.14, 1936; "9" 132 Eskadra
-
48-059 "6" 141 Eskadra Spring
1939; "2" 161 Eskadra Spring 1939; "1" 112 Eskadra s/n 8.14, 1936; "5" 111
Eskadra
-
48-060 "66" Skalski's aircraft
142 Eskadra Sept 1939; "4" 152 Eskadra s/n 8.110 Stanislaw Brzeski Sept
1939; "8" 112 Eskadra s/n 8.114 stanislaw Krol, 1939; & 162 Eskadra -
Czeslaw Glowczynski, Sept 1939.
Another U.S based firm is working on a 111 Kosciuszko
Squadron aircraft and others on their sheets.
The following Polish modelers and aviation buffs helped me
to prepare the kit review:
-
Piotr Wisniewski,
-
Franek Grabowski,
-
Wociech Perkowski,
-
"Sean" Brzozowski
Any errors in my text are my own.
Many thanks also to Wojciech B. Buhlak from Mirage who supplied the review
kits.
One minor additional note: The possible problem with the the wing struts
being 1.5mm too short may have been due to another Polish modeler mixing
up front and back struts.
Happy Polish modeling everyone!
Thanks to Mirage Hobby for the review sample.
Review Copyright © 2002 by
Mike Dobrzelecki
Images Copyright © 2002 by Bob Hester
Page Created 14 November, 2002
Last updated 22 July, 2003
Back to HyperScale Main Page
Back to Reviews Page
Home | What's
New | Features
| Gallery |
Reviews | Reference
| Forum
| Search