|
A-4M Conversion
Cutting Edge Modelworks
S
u m m a r y
|
| Catalogue Number: |
To Be Advised |
| Scale: |
1/48 scale |
| Contents and Media: |
10 resin parts |
| Price: |
To Be Advised |
| Review Type: |
FirstLook |
| Advantages: |
Accurate; versatile; excellent clear
resin parts; good fit |
| Disadvantages: |
Additional parts/sets required for
full A-4M airframe conversion |
| Recommendation: |
Recommended to experienced
modellers. |

HyperScale is proudly sponsored by Meteor
Productions
Reviewed by David W. Aungst
I have been working with Meteor Productions for about a
year now to help them produce an A-4M conversion in their Cutting Edge
resin line for the Hasegawa A-4 Skyhawk kit.
My thrust was to have them create a 1/32nd scale
conversion for the big 1/32nd scale Hasegawa A-4E/F kit. Using my
research and the rough masters I had completed in 1/32nd scale as a
guide, Meteor Productions decided to first put together a 1/48th scale
conversion for the newer 1/48th scale Hasegawa A-4E/F kit. Since I
generally built mostly 1/48th scale models, I was not going to argue
with this.
This review is for the 1/48th scale A-4M conversion. The 1/32nd scale
conversion is also coming, but it will not be out until later this year.
Big scale modelers will have to wait only a little while longer.
Cutting Edge's
Multiple Set Conversion
|
As has been the case in the past with some Cutting Edge
sets, the total A-4M conversion is not all contained in one set. It will
actually require two sets to make the full A-4M airframe
conversion. Optionally, you will need to decide on whether or not you
want to get a cockpit update/conversion, meaning you might need a third
set for your A-4M conversion.
This splitting up of the sets into multiple releases is due to the fact
that some of the components making an A-4M unique are also found in
other Skyhawk versions. By dividing up the conversion sets into
components, you can mix and match the sets you buy to build the exact
Skyhawk you want. To make the full A-4M conversion, you need the
following sets:
-
CEC48316 -- the A-4F "Super
Fox" Conversion Set
-
CEC48334 -- the A-4M
Airframe Conversion Set
-
CEC48279 -- the A-4 Cockpit
Update Set - optional
-
CEC48##1 -- the A-4M Late
Production Cockpit Update/Conversion Set - optional
-
CEC48##2 -- the A-4M Late
Production "Super Mike" Landing Gear Update/Conversion Set -
optional
The "Super Fox" conversion set (CEC48316) provides the
needed bulged intakes that were standard on all A-4M Skyhawks. It also
provides the "hotdog" antenna for the top of the tail, although this is
not present on early A-4M Skyhawks. I am not going to go into any great
detail on this set as it has been reviewed in other postings.
The A-4M airframe conversion set (CEC48334, the purpose of this posting)
provides all the needed fuselage changes to update the Hasegawa A-4E/F
kit to be and A-4M, except for the engine intakes and "hotdog" antenna.
See the next section for a detailed look at the pieces of this
conversion.
The A-4 cockpit update set (CEC48279) provides an updated cockpit that
is a better detailed version of what the Hasegawa kit already has in it.
I will not say much more as this, too, has been reviewed in other
postings. You would only use this set in an early production A-4M, prior
to any upgrades that brought these aircraft up to the later standards.
Optionally, you could also just use the Hasegawa kit cockpit in an early
production A-4M.
The A-4M late production cockpit update/conversion set (CEC48##1)
provides an updated cockpit that includes the enlarged main instrument
panel and HUD found on the middle and late production airframes. This
set is not yet available, but is expected to be out later this year.
This set is optional to your A-4M conversion as not all A-4M Skyhawks
had an updated cockpit. You only need this set for a middle or late
production A-4M. This set is due to be released sometime shortly after
Nationals.
The A-4M late production "Super Mike" landing gear update/conversion set
(CEC48##2) provides the minimum requirements to update the wheel well
doors and landing gear to build an A-4M "Super Mike" Skyhawk. The last
block of A-4M Skyhawks had beefed-up landing gear to support higher
gross weights. The revision to the landing gear changed the contours of
the lower wing and main wheel well doors. Because of these changes, the
last block of A-4M Skyhawks were referred to as "Super Mike" Skyhawks
(similar to how the improved A-4F Skyhawks were referred to as "Super
Fox" Skyhawks). This set will include replacement wheel well doors,
pieces to modify the lower wing to match the new doors, torque link
sissors for the bottom of the main landing gear struts, and replacement
main wheels. The set will not include replacement main landing gear
legs. The difference in the thickness of the legs in 1/48th scale is not
enough to matter. This set is due to be released sometime shortly after
Nationals.
Cutting Edge
A-4M Conversion Described
|
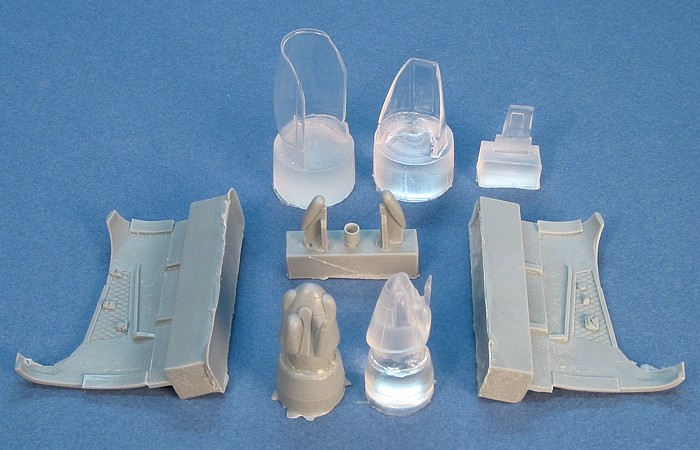
The A-4M airframe conversion provides eight casting
blocks holding ten conversion pieces.
The two largest pieces in the set are the two fuselage
side wall inserts to change the shape of the cockpit opening. These
pieces are designed to fit into openings in the fuselage that you cut
out following the existing panel lines of the Hasegawa kit.
 |
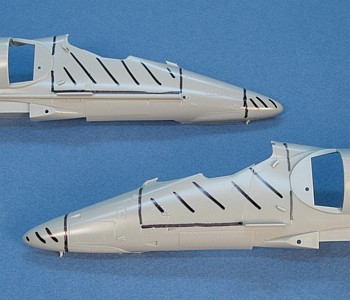 |
I scored a deep groove along the lower edge of the
fuselage conversion pieces by pulling an X-acto knife backwards. I then
bend back and snaped free the pieces from their casting blocks. I quick
touch from an X-acto flat file trued up the edge and made the pieces
ready to use.
I used a Dremel razor saw to hack out the right fuselage area. I cut
about 1/32nd of an inch smaller then the intended panel lines. I then
used an X-acto file to adjust the cuts to perfectly meet the panel line,
dry fitting constantly with the conversion piece to confirm its fit. The
piece fits so well that I feel it will need no filler. Gluing from the
back side with super glue, the joints will look like the original panel
lines of the kit.
With the right side going so well (and fast, about ten minutes), I got
cocky and careless on the left side and cut too far down the fuselage on
the lower cut. It cost me an hour of playing around to fit the
conversion piece into the fuselage without a big gap. I fitted a piece
of strip styrene to fill the unwanted gap on the lower edge of the
cutout. Read the Cutting Edge instructions and take heed -- "Measure
Twice, Cut Once!"
 |
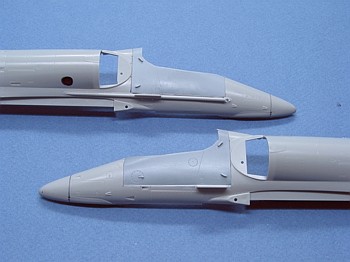 |
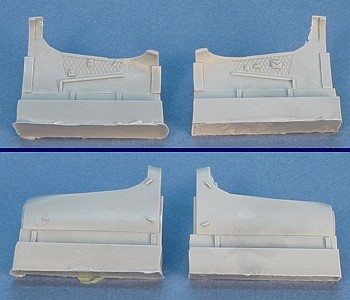
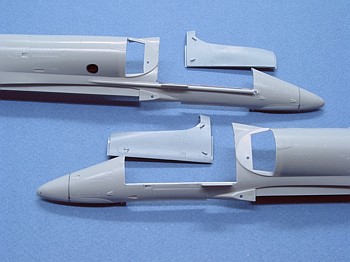
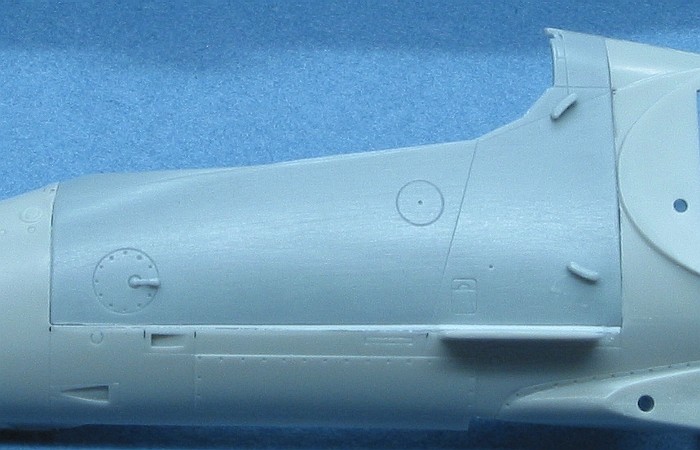
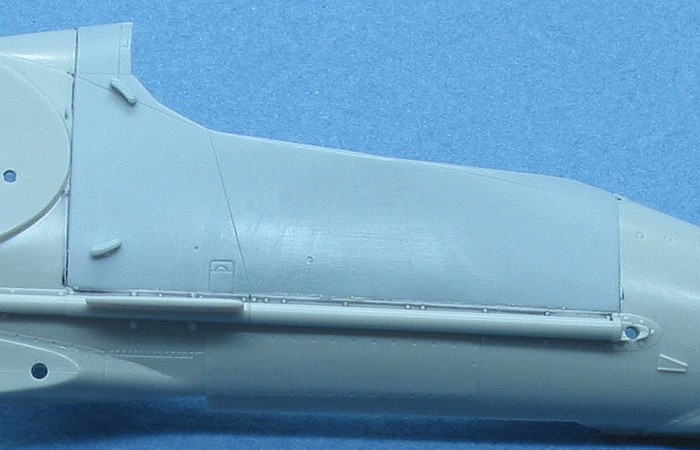
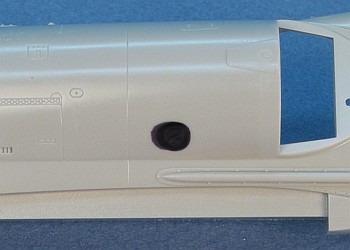
Cut (Left) and Assembled (Right) Fuselage Inserts
Left Side Close-Up (Note White Styrene Strip Used to
Fill Unwanted Gap)
Right Side Close-Up
The two close-up pictures show the fit of the "raw"
conversion. I have done nothing at this point except apply super glue
from the back side. I will lightly sand the joints to even them off a
bit and use some Mr. Surfacer to slightly fill the seams. As they are
supposed to be panel lines, I do not want to remove the seams, only
reduce their size.
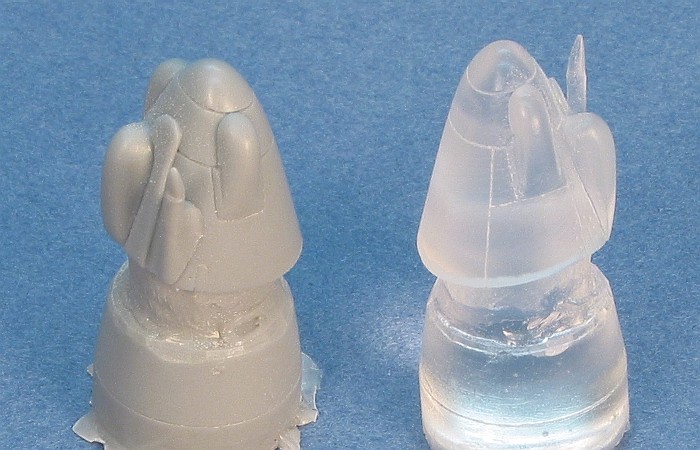
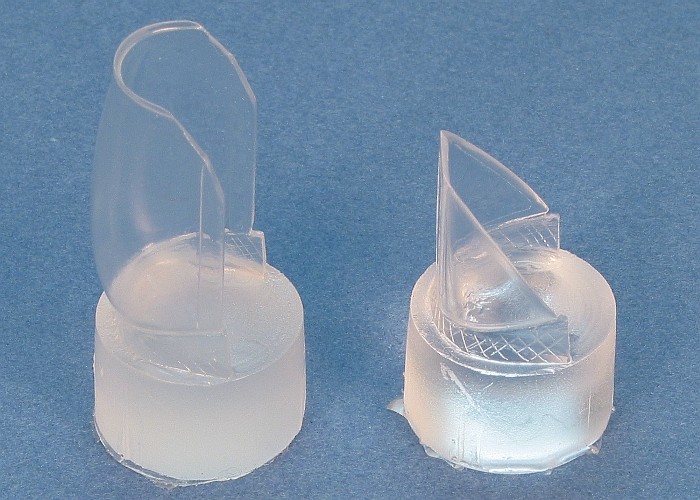
Next, you have replacement nose tips with all the A-4M specific bumps
and bulges cast onto them. These nose tips pertain to middle and late
production A-4Ms. The original early production A-4M aircraft had the
same nose as already provided in the Hasegawa kit.
Two pieces are provided, one solid and one clear. It really only was
necessary to provide the clear one, but Meteor gives you two. For middle
production A-4M aircraft, use either nose and paint the whole nose to
match the aircraft's camouflage. For late production A-4M aircraft, use
the clear one and mask off the extreme tip of the nose to stay clear.
This clear tip will then represent the ARBS camera window.
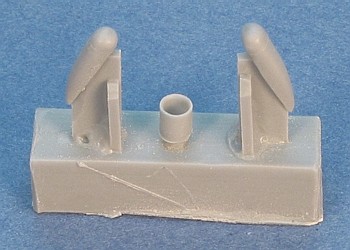
Next is a casting block with three small pieces cast on
it. The outer two pieces are the bulbous antennae that are found on
either side of the engine exhaust. These pertain to middle and late
production A-4Ms. The original early production A-4M aircraft had the
same engine exhaust antennae as already provided in the Hasegawa kit.
The middle piece on this casting block is the APU exhaust pipe. The APU
exhaust is found low on the right side of the fuselage, just above the
rear end of the aerial refueling pipe fairing, over the wing. It is
necessary to cut an appropriately sized hole in the fuselage to
accommodate this exhaust pipe.
 |
 |
The true gems of the conversion set are the clear cast
resin canopy and windscreen. Once removed from their casting blocks, you
will be hard pressed to tell these pieces were not right out of a
commercial model kit. There will be no need for any skills relating to
the use of vacuum formed canopies in this conversion. In the picture,
here, they look a bit clouded, but I can assure you they are thin,
clear, and beautiful.
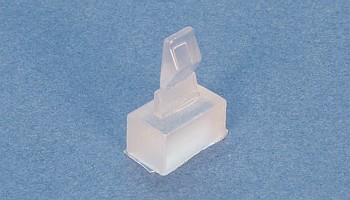
An extra piece I had in the set that forshadows what is
to come from Cutting Edge is a strike camera window. While this does not
belong on the A-4M, it does go on late A-4Ns and A-4Ks (following their
respective improvement programs). Expect more Skyhawk conversions in the
Cutting Edge line of products.
A Brief A-4M
Skyhawk Anatomy Lesson
|
With the release of this A-4M airframe conversion, it is
finally possible to build an accurate 1/48th scale A-4M without having
to move mountains and scratch build a lot of details (not the least of
which is a new canopy and windscreen). But, the A-4M Skyhawk comes in
many "flavors". This section is intended to assist you to decide what
sets you need to get to build which aircraft.
The following table outlines the sets you need to get for each "flavor"
of the airframe. This table relates specifically to how the aircraft
were delivered. Later in life, all A-4M aircraft were updated to the
"late" standard for everything except the beefed-up "Super Mike" landing
gear.
|
Aircraft |
Sets |
CEC48316
"Super Fox" Update |
CEC48334
A-4M Airframe Conv |
CEC48279
A-4 Cockpit Update |
CEC48##1
A-4M Late Cockpit |
CEC48##2
"Super Mike" Update |
| Early
Production A-4M |
X |
X |
X |
|
|
| Middle
Production A-4M |
X |
X |
|
X |
|
| Late
Production A-4M |
X |
X |
|
X |
X |
General A-4M
Construction Notes
|
This section outlines construction items that are common
to all A-4M Skyhawks.
-
Cut the kit fuselage and
install the Cutting Edge cockpit side walls. Use the new canopy and
windscreen.
-
Use the bulged engine
intakes from the "Super Fox" conversion.
-
Drill an appropriate size
hole in the right fuselage and install the Cutting Edge APU exhaust
pipe. Note that the first few A-4M aircraft to come off the assembly
line did not have the APU installed. Most of these aircraft went to
VMA-324 "Vagabonds". By the time VMA-324 transitioned out of the A-4M,
the APUs were retrofitted into the aircraft.
-
Consult references to get
the correct configuration for the spike antennae and formation light
on the trailing edge of the vertical tail, below the rudder. These
were revised from how they looked on the A-4E/F.
-
Add the parachute brake
housing under the rear fuselage (parts D11 and D28). Note that the kit
provides two different parachute brake housings. The part numbers I
list here are correct for the A-4M. The other parts pertain to other
Skyhawk versions.
-
All A-4M Skyhawks use the
bent refueling probe.
-
No A-4M Skyhawks have a
flare/chaff dispensor on the left side of the rear fuselage. Use the
kit part (part A6) with no dispensor molded into it.
-
Construct all the other
antennae and details (not mentioned here or below) to match what the
Hasegawa kit refers to as "Scheme 2".
-
The pitot boom for the
leading edge of the tail is available in the Hasegawa kit (part E20).
Most A-4Ms eventually had this style of pitot retrofitted onto them.
This pitot boom is mutually exclusive with the "L" shaped pitot on the
upper nose (part F24). An aircraft with the tail mounted pitot will
not have the nose mounted one.
-
There are two static points
molded to the right side of the nose (small trangular shapes with
raised edging). These are also mutually exclusive. You need to carve
or sand off one of these based on the type of refueling probe the
aircraft has. Keep the rear static port for aircraft with a straight
refueling probe. Keep the forward one for aircraft with a bent
refueling probe. Hence, all A-4Ms will keep the forward one and should
have the rear one carved or sanded off.
Early-Construction A-4M Construction Notes
|
This conversion is the least amount of change from the
stock Hasegawa A-4E/F kit. This configuration pertains to BuNos 158148
through 158196 and 158412 through 158435 as they were delivered to the
USMC.
-
Use the Hasegawa kit
provided cockpit or the Cutting Edge A-4 Cockpit Update set
(CEC48279).
-
Do not cut the nose tip off
the fuselage. Leave the Hasegawa kit provided nose intact.
-
Use the Hasegawa kit
provided square vertical tail tip (part A14).
-
Use the small Hasegawa kit
provided ECM antennae on either side of the engine exhaust (parts D17
and D18).
Middle-Construction A-4M Construction Notes
|
This configuration pertains to BuNos 159470 through
159493, 159778 through 159790, and 160022 through 160045 as they were
delivered to the USMC:
-
Use the Cutting Edge A-4M
Late Production Cockpit Update/Conversion Set (CEC48##1). Remove the
large square CRT from the right side of the main instrument panel,
leaving a blank area on the panel.
-
This CRT is the TV screen
for the ARBS camera in the nose, which the middle production airframes
did not have installed, yet.
-
Cut the nose tip off the
fuselage. Install the non-transparent Cutting Edge replacement nose
tip.
-
Use the Cutting Edge
"hotdog" tail top antenna from the "Super Fox" conversion.
-
Use the Cutting Edge bulbous
antennae on either side of the engine exhaust.
Late-Construction A-4M Construction Notes
|
This configuration pertains to BuNos 160241 through 160264 as they were
delivered to the USMC. These aircraft were all "Super Mike" airframes.
-
Use the Cutting Edge A-4M
Late Production Cockpit Update/Conversion Set (CEC48##1).
-
Cut the nose tip off the
fuselage. Install the transparent Cutting Edge replacement nose tip.
When painting the model, mask off the extreme tip of the nose and
leave it clear to represent the ARBS camera window.
-
Use the Cutting Edge
"hotdog" tail top antenna from the "Super Fox" conversion.
-
Use the Cutting Edge bulbous
antennae that are found on either side of the engine exhaust.
-
Use the Cutting Edge A-4M
Late Production "Super Mike" Landing Gear Update/Conversion Set
(CEC48##2).
A-4M Upgrade
Construction Notes
|
To be complete for all the "bean counters" out there,
here are a few BuNo notes of importance.
-
A-4Fs 155042 and 155049 were
the prototype A-4M conversions and exibit most all the traits of the
early production A-4M. I can not find information stating whether
these were considered YA-4Ms or just A-4Ms. I can also find no mention
of whether they were further upgraded (as most A-4Ms were) to late
standards.
-
A-4M 158426 was the
prototype conversion for the middle production configuration and came
off the assembly line as a middle production airframe, not an early
one.
-
A-4M 160036 was the
prototype conversion for the "Super Mike" and came off the assembly
line as a late production "Super Mike" including the beefed-up landing
gear.
-
As time passed, all A-4M
Skyhawks were retrofitted and brought up to the same production
standard as the late production aircraft. The only exception is the
landing gear. Only the aircraft delivered as "Super Mike" Skyhawks had
the beefed-up landing gear. All the early and middle production A-4M
Skyhawks retained the original Skyhawk landing gear as provided in the
Hasegawa A-4E/F kit.
Other Skyhawk
Possibilities
|
There will be those among you that will not want to
start with a simple A-4M. Hence, here are some notes for making other
Skyhawk versions from this A-4M Airframe Conversion set. I am not going
to get into great detail here. Check references for varied antennae fits
and locations.
Israeli A-4N
Construction Notes
|
To build an early Israeli A-4N, most everything you need
is in the sets listed above. An early A-4N is really not much more than
an early production A-4M with no APU exhaust on the right fuselage and a
varied cannon armament. The A-4N came standard with the 30mm DEFA
cannons in fairings below the wing roots, replacing the 20mm cannons in
the wing roots. The varied cannon armament is not in the Hasegawa kit or
the above listed Cutting Edge sets. The 30mm cannons and fairings are
available in the A-4H conversion from Cutting Edge (CEC48322).
A late A-4N has the engine exhaust extension and some different
antennae. A lot of the different antennae are already in the Hasegawa
kit. The extended engine exhaust is available in the A-4H conversion
from Cutting Edge (CEC48322). The strike camera provided in the A-4M
conversion set would replace the anti-collision beacon on the left wheel
canoe fairing. The light is then moved to the right side canoe fairing,
just ahead of the fuel dump mast.
From what I read, the cockpit is updated in late A-4Ns, but I have never
seen a picture to know how much different this is from its original
configuration (I have not looked too hard, though).
Kuwaiti A-4KU
Construction Notes
|
To build a Kuwaiti A-4KU, most everything you need is in
the sets listed above. An A-4KU is truely not much more than an early
production A-4M with some varied antennae.
South American
A-4M Construction Notes
|
Brazil and Argentina have both purchased used, late
model A-4s.
The Argentine machines are ex-USMC A-4Ms. While the antennae fit is
varied, the base airframes will be middle production A-4Ms with the ARBS
camera in the nose. I have never looked to see whether any late
production airframes ("Super Mike" aircraft) were sold to Argentina. I
aussme the possibility would exist for this.
The Brazilian machines are ex-Kuwaiti A-4KUs. With slightly varied
antennae, these aircraft are the same as the Kuwaiti A-4KUs mentioned
above. Note that these aircraft are operational on Brazil's aircraft
carriers, making the point that most all A-4s are navalized with
catapult launch equipment, even if the user country did not operate them
from a carrier (Kuwait has no aircraft carriers).
There you have it -- a run down on the new A-4M
conversion from Cutting Edge as well as a quick reference to the anatomy
of the A-4M Skyhawk and other late model Skyhawks. I am currently
building this conversion with hopes to have it done for display at the
IPMS Nationals. With all the big modeling pushes I have already made
this year, I am unsure if I will be able to push one more time to get
this one done in time, but I am going to give it a try.
With the late production cockpit not being available just yet, I am
choosing to build my conversion as an early production airframe.
Besides, this is less cutting and converting of the kit, so I stand a
better chance of completing it in time.
See you in Virginia Beach!
Thanks to Meteor Productions for the review sample
Review and Images Copyright © 2002 by
David W. Aungst
Page Created 08 July, 2002
Last updated 22 July, 2003
Back to HyperScale Main Page
Back to Reviews Page
|
 Home | What's
New | Features
| Gallery |
Reviews | Reference
| Forum
| Search
Home | What's
New | Features
| Gallery |
Reviews | Reference
| Forum
| Search