|
Messerschmitt
Bf 109G-6
Meteor Productions
Reviewed by Brett Green
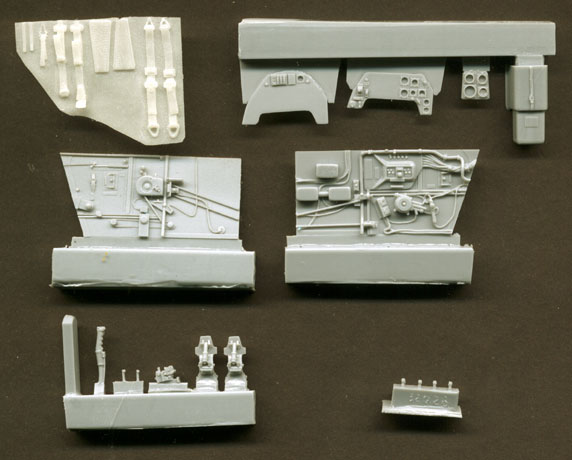
Hasegawa's 1/32 scale Messerschmitt Bf 109G-6 is an impressive and accurate model. The cockpit is quite adequate for a stock kit, but many modellers will crave more detail. The large scale will certainly reward any extra effort in this area. Cutting Edge is the first company to release a replacement cockpit. Two versions are available - one with a resin harness cast onto the seat and another with a flexible harnesses supplied separately. Both cockpit sets include fourteen parts in grey resin (plus three spare parts) and one acetate sheet with printed instruments. A short length of rubber tube is also included. Interestingly, Cutting Edge manage to deliver much improved detail compared to the Hasegawa kit with a smaller parts count. The resin is perfectly cast on both of my samples.
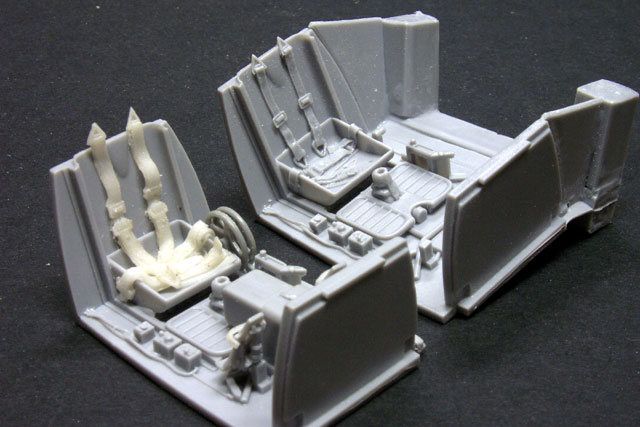
There were many minor detail and colour variations between Bf 109G-6 cockpits due to its long production run and chaotic manufacturing environment. Cutting Edge's set seems to represent a mid-late production Bf 109G-6 cockpit in factory configuration. The most obvious indicator is the Revi 16B gunsight, as used in later Gustavs. The largest resin part in both sets is the cockpit tub comprising the floor, rear wall, firewall, control column boot and seat. The seat is depicted with the backrest installed. Hasegawa has not moulded the backrest as part of its cockpit, so the Cutting Edge set provides some variety in this respect. The only difference between the sets is the method of depicting the harness. The casting block for the tub is connected along the full length of the rear wall, floor and firewall. Some of these surfaces are subtly curved, making removal from the block a delicate exercise. I used a razor saw to remove the bulk of the waste material, then tidied up the scraps with a sharp hobby knife.
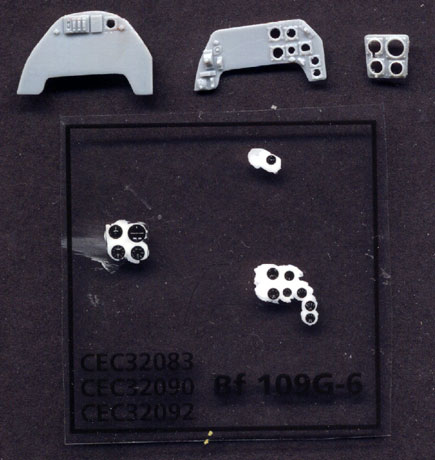
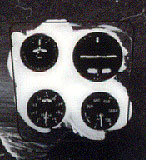
The remaining resin parts are cast onto smaller blocks. The sidewalls feature truly exquisite detail. This area is a particular improvement over the Hasegawa kit. Most of the detail is cast on with a few exceptions. These are two tiny levers (supplied as separate resin parts); the throttle cable and upper trim wheel chain, The last two items must be sourced by the modeller. The instrument panel is another highlight. It is supplied in three resin pieces with acetate instruments. Although the instrument detail is hard to see with the naked eye, it is reproduced perfectly and looks great under a magnifying glass! The effect of the dials behind the resin bezels is pretty nice too. The rudder pedals are also up to this high standard. It is a pity that the comprehensive details on the back of the pedals will be hidden when the model is finished. Click the thumbnails below to view larger images:
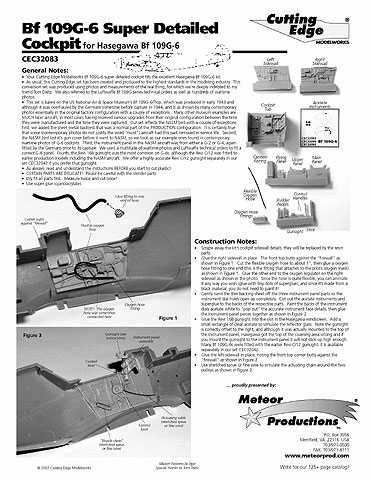
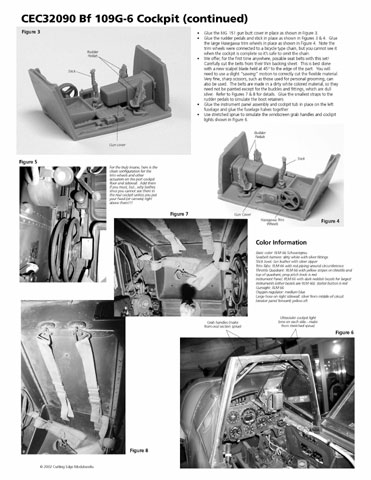
The subtly detailed control column, gunsight and breech cover add to the overall appeal of this set. A separate rubber oxygen hose is also a nice touch. The fitting for the pilot's end of the hose is supplied in resin. This part is tiny, even in this large scale, and aligning the resin fitting to the end of the hose is a serious challenge. Cutting Edge recognises the risks - three spare fittings are supplied. Cutting Edge chose to use the two-piece plastic trim wheel from Hasegawa's kit. This delicate and accurate kit part is worthy of Cutting Edge's resin. I'll bet it is easier to clean up than a resin part would be too. The cast-on harness in set CEC32083 is realistically draped and should look great after painting and an oil wash. The innovative harness in set CEC32090 is supplied in flexible resin. I have seen similar resin used as Zimmerit sheets on armour models, but it is the first time I have seen the material used for this purpose. The seat belts are moulded into the flexible sheet and must be carefully cut out before use. The modeller is required to add a few details from scratch including the canopy release handle and prominent ultraviolet instrument lighting. These lights varied in style and mounting position, so check references carefully. Instructions are typical of other Cutting Edge releases. Photographs of the kit parts and reference pictures of the real aircraft support detailed construction notes on a two-sided, letter sized sheet. Click the thumbnails below to view larger images:
I did not really need an excuse to build a second Hasegawa Bf 109G-6, but the arrival of Cutting Edge's cockpit set got me started straight away. I have been very happy with the effect conveyed by seat belts cast on to resin seats, but I decided to tackle Cutting Edge's set with the unique flexible resin harness this time.
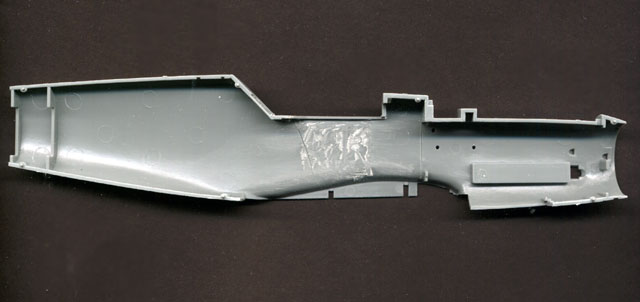
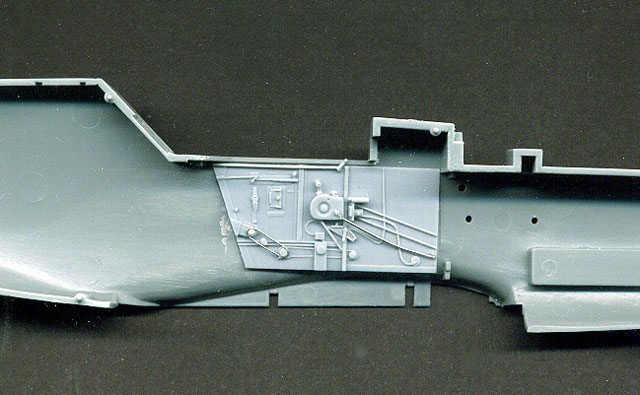
Preparation Careful cleanup and preparation is always crucial when working with resin. The biggest casting block was on the cockpit tub. This bulk of this block was removed using a razor saw, and the remainder was trimmed off with a hobby knife. Other resin parts were removed by simply slicing them off or repeatedly scribing along the join line with a sharp knife until the piece came free. Raised detail must be removed from the kit's fuselage interior to permit the resin sidewalls to be glued in place. I slipped a grinding wheel in my Dremel Motor Tool and removed all moulded sidewall detail below the upper cockpit rails. Take care to leave these top rails in place - they will help locate the resin sidewalls.
I test-fitted the port resin sidewall by pressing small blobs of BluTack on the back of the part. The cockpit tub was then offered to the fuselage half with the sidewall tacked in place. I shifted the sidewall slightly until the tub was aligned with the fuselage locating points and the sidewall. The tub was then removed and lines were scribed on the fuselage using the front and back of the resin sidewalls as a guide. This would assist with precise fitting later on. This process was repeated on the starboard side. The fit of these main parts was perfect. No extra trimming or adjustment was required. The instrument panel components were thinned on a sanding block until the wafer of resin covering the back of the dial faces disappeared. The resulting holes were cleaned up with a sharp knife.
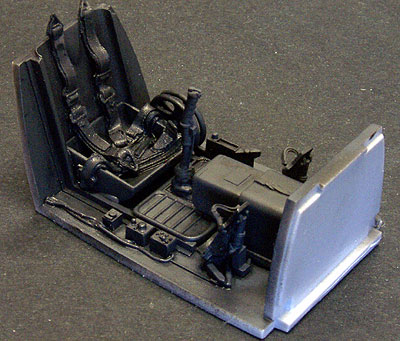
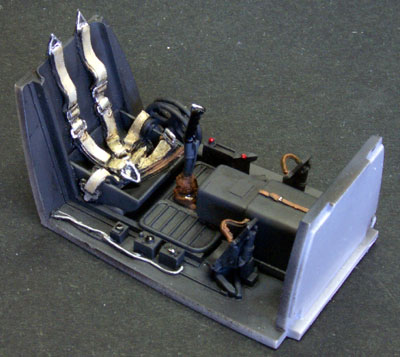
Flexible Harness The harness is supplied on a small flexible resin sheet. The colour and texture of the material is very much like calamari! The resin is very elastic, so much so that it is difficult to "slice" in a conventional way. The material tends to stretch as the blade is dragged along the material even with a new knife. After experimenting with a few methods, I eventually decided to "chop" the resin with a short blade. First I cut horizontal slices toward details that extended beyond the width of the straps (eg buckles, connectors etc); then removed the belts by following their outline with a firm, downward chopping motion. I emphasise here that the blade must be short, otherwise detail protruding past the width of the belt will be cut off too. The buckles and connectors are cast onto the belts. I could not imagine a technique to precisely hollow these parts, so I decided to paint them "hollow" later. With the harness parts separated, I attached the chafing pads to the lap belts and applied a spot of super glue to one of the mounting points. This was repeated for the other lap belt before more glue spots were added and the belts pushed into place on the seat pan. At this stage I thought the belts looked overscale and the belts seemed to be "floating" in places. I slipped some more super glue under the belts using the blade of a hobby knife and prodded the belts hard into the corners of the seat. This greatly improved the look of the lap belts. Take note, once you have glued this material in place it stays glued. It is incredibly responsive to super glue. The shoulder belts were installed using the same method. A drop of glue anchored the belts at the top of the seat first, then more spots of super glue were applied and the belts positioned. Now the seat was looking good.
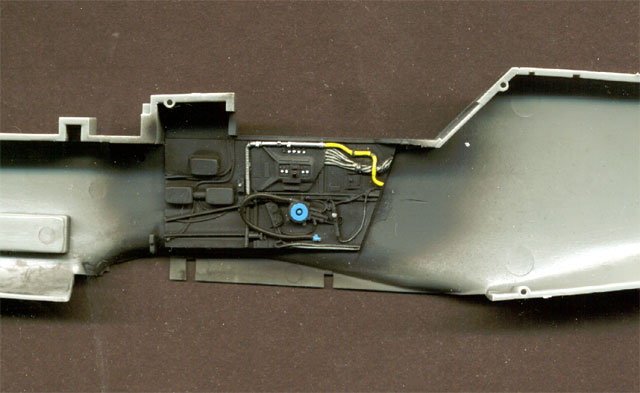
Assembly and Painting After preparation, assembly was quite straightforward. I glued the sidewalls to the fuselage with super glue using the lines I had scribed earlier as a guide. The two levers were added to the canopy ejection actuator and below the throttle quadrant. The "chain" for the trim wheel and the throttle cable were added from fuse wire. The cannon breech cover, control column and the kit's trim wheel assembly were secured to the tub.
Toe straps for the rudder pedals are supplied in the flexible resin material. I added these before gluing the pedals to the tub. These straps do look too thick. I will probably use scrap material from the flexible resin sheet (about half the thickness of the "straps") for this task in future. The rudder pedals were a little fiddly to mount too - take care to get these parts lined up properly from all angles. At this stage all the cockpit parts were painted black, followed by a light coat of Tamiya XF-63 German Grey. I drenched all the parts in a thin black oil wash. After a half hour, I wiped the excess wash from the resin parts with a clean cloth and a Q-Tip. The oxygen hose was cut to 2.5cm and one end was dipped in super glue accelerator. While it was still on its mount, I applied a tiny drop of super glue to the end of the oxygen hose fitting with the tip of a hobby knife. I carefully brought the hose and the fitting together for an instant bond. The hose fitting, now connected to the hose, was then sliced off its mounting block. This little assembly was glued to the front of the throttle quadrant using the same technique as the fitting - the throttle had a spot of super glue applied, the end of the hose was dipped in accelerator. The back of the acetate instruments was painted white. These were sandwiched between the three panels. The effect is very authentic. Click the thumbnails below to view larger images:
Details were now picked out with a fine brush in silver, yellow, red, white and semi-gloss black. Finally, the harness was painted with Tamiya XF-55 Deck Tan. When dry, I applied a liberal wash of Raw Sienna oil paint. I wiped the paint off the high points of the harness with my finger, then painted the buckles and connectors silver. The visible portions of the chafing pads were painted brown. Although the raw belts do look a little thick, careful painting really gives them a convincing, three-dimensional look.
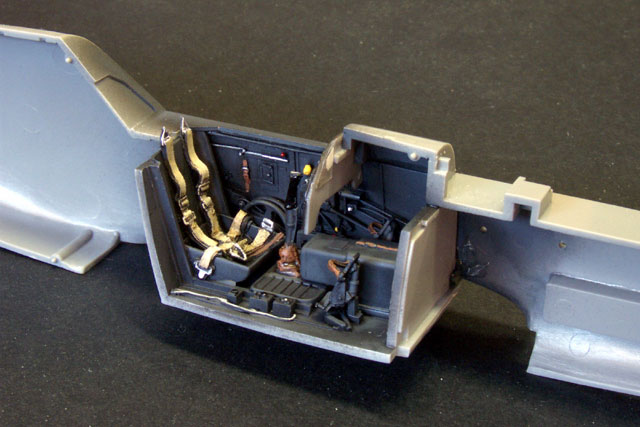
With the paint job finished, the instrument panel and cockpit tub were fitted to the port fuselage side. I ran a bead of super glue along the front and back of the tub where it met with the kit fuselage to ensure a secure bond. Finally, the fuselage halves were joined, trapping the Cutting Edge cockpit permanently.
Cutting Edge's resin cockpit set undoubtedly improves Hasegawa's excellent 1/32 scale Gustav. The resin parts are beautifully detailed, the seat backrest makes a change from the kit configuration and the harness is very obvious in this large scale. For a direct comparison you can click here to see my article on building the Hasegawa kit straight from the box. I used the same basic painting techniques to finish the standard kit cockpit that I used here, so the comparison is valid
I spent a total of around six hours preparing, assembling and painting Cutting Edge's resin cockpit for Hasegawa's 1/32 scale Messerschmitt Bf 109G-6. As far as I am concerned, it was a good investment of time!
Thanks to Meteor Productions for the review samples. Cutting Edge Modelworks products are available from Meteor Productions Website
|
|||||||||||||||||||||||||||||||||||||||||||||||||||||||||||||


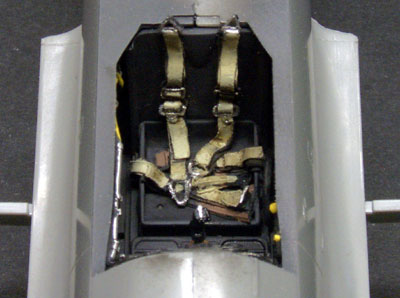 I was delighted with the final effect of the flexible resin
harness. It requires more effort than the cast-on version, but it does look
impressively three-dimensional and it guarantees an individual result every
time. This harness also offers the option of draping the shoulder belts over
the cockpit sill - something seen in wartime photos from time to time. It is
nice that Cutting Edge have still provided the option of cast-on harnesses
though. This set should also look great.
I was delighted with the final effect of the flexible resin
harness. It requires more effort than the cast-on version, but it does look
impressively three-dimensional and it guarantees an individual result every
time. This harness also offers the option of draping the shoulder belts over
the cockpit sill - something seen in wartime photos from time to time. It is
nice that Cutting Edge have still provided the option of cast-on harnesses
though. This set should also look great.