|
F-104G/J
Cockpit
Cutting
Edge
S
u m m a r y
|
| Catalogue Number: |
CEC48250 / 48251 |
| Scale: |
1/48 |
| Contents and Media: |
14 resin parts and 1 acetate
instrument film |
| Price: |
US$15.99 |
| Review Type: |
FirstLook |
| Advantages: |
Excellent detail; Good fit; Option
to use acetate film instruments |
| Disadvantages: |
Oxygen hoses on seat are missing. |
| Recommendation: |
Highly recommended for the new
Hasegawa kits. |
Reviewed by Dave
Williams

HyperScale is proudly sponsored by Meteor
Productions
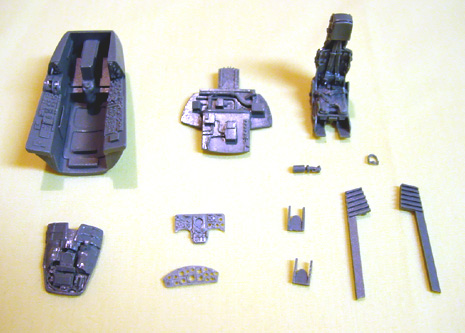
This is one of at least three cockpit sets announced by Cutting Edge for the
new Hasegawa 1/48 scale F-104 kits. This set contains the Lockheed C-2 upward
firing ejection seat as fitted to CF-104s, F-104Js, and many F-104Gs.
Set CEC 48251 is otherwise identical, with the exception that it has the
Martin-Baker GQ7 ejection seat which was used by a few nations, most notably
Germany.
 The
set completely replaces the kit cockpit, with the exception of the
throttle handle, for which Hasegawa part R2 is used. The set is molded in
the dark gray resin CE is now using which seems to be fairly strong,
although it is a little difficult to photograph. The
set completely replaces the kit cockpit, with the exception of the
throttle handle, for which Hasegawa part R2 is used. The set is molded in
the dark gray resin CE is now using which seems to be fairly strong,
although it is a little difficult to photograph.
The major item in the set is the well-detailed one-piece cockpit tub.
This part includes the detail of the hatch that forms the cockpit floor.
Although the C-2 seat was upward firing, the seat was installed and
removed from the bottom of the fuselage. I'm not sure why this was, unless
it was a legacy from the early F-104s that had a downward firing ejection
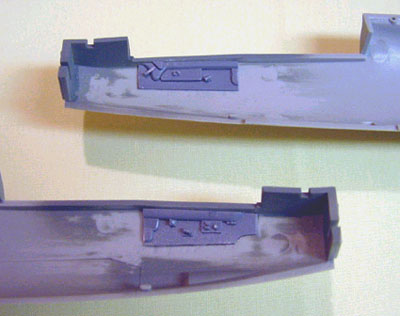
seat. The rear bulkhead is well detailed and the cockpit sidewalls are
separate parts, which are much more accurate than the simple rib detail
molded into the Hasegawa fuselage halves. Once you remove the prominent
molding plug on the front of the cockpit tub, the cockpit parts slip right
in with almost no trimming once the detail molded into kit fuselage is
removed.
Unlike the one-piece Hasegawa instrument panel, the CE panel is molded
in a couple of parts. The side panels are molded with the cockpit tubs and
the upper and lower parts of the instrument panel are separate pieces. The
lower half is attached to the center of the tub, while the upper half is
attached to the detailed cockpit coaming part. This breakdown allows the
installation of the coaming/upper instrument panel after the fuselage
halves have been glued together. Hasegawa implies that you can put their
instrument panel in after the fuselage is together, but as the kit part
has the side panels attached, it is larger than the cockpit opening. |
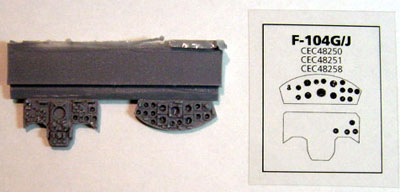 As
cast, the instrument panel has needle detail molded inside all of the round
instruments. As an alternative, CE provides an acetate film panel like what you
get in the Eduard sets. You can sand the backside of the panels until you sand
the back of the instruments out and then apply the film instruments. (The
closeup photo of the instrument panels with the film shows them as they come in
the set. In the photo with all the parts, the instruments have been hollowed
out.) As
cast, the instrument panel has needle detail molded inside all of the round
instruments. As an alternative, CE provides an acetate film panel like what you
get in the Eduard sets. You can sand the backside of the panels until you sand
the back of the instruments out and then apply the film instruments. (The
closeup photo of the instrument panels with the film shows them as they come in
the set. In the photo with all the parts, the instruments have been hollowed
out.)
The Lockheed C-2 ejection seat is a jewel that is designed to slide into the
separate side rails, which are attached to the cockpit floor and top of the rear
bulkhead. To be nit picky, the prominent oxygen hoses that run along the sides
of the seat are missing, although it probably would have been difficult to mold
these as part of the seat as they stand off a little from the actual seat. The
instructions don't mention anything, but Hasegawa parts T2 and T6 represent
these hoses and they might fit, although I haven't tried them yet. As an
alternative, here is a chance to try your favorite 1/48 scale oxygen hose
technique.
The instructions mention that the set can be adapted to the old Monogram kit,
but you are on your own in fitting it. Overall, highly recommended.
I have already started to fit the set to a Hasegawa F-104J kit. Here are some
of my observations:
-
 The
instructions have you dry-fit the cockpit tub, without sidewalls, to the
fuselage halves, use a pencil to mark the location of the sidewalls, and
then remove the tub and glue the sidewalls to the fuselage halves. What
worked for me was to glue, or temporarily tape, the rear bulkhead to the
cockpit tub and then use the open-topped box formed by the tub and rear
bulkhead to adjust the fit of the sidewalls to the tub/bulkhead combination.
The top of the sidewall should line up with the top of the tub at the front
and the top of the bulkhead at the rear. The CE tub is sized to exactly fit
between the bulkhead at the very front of the fuselage halves and the
nosewheel well attached to the underfuselage part, so if you get the
position of the sidewalls off, you may have problems later. The easy way out
is to glue the sidewalls to the tub instead of the fuselage and then put the
whole thing in as one. What I did was to put a small blob of Blu-Tac like
putty on one of the side consoles to hold the sidewall in place, put some
super glue on the back of the sidewall only, and stick the whole assembly
into one of the fuselage halves. Then, I used a paintbrush handle to push
the sidewall against the fuselage side, held it until the glue set and then
removed the tub, leaving the sidewall in place. Repeat for the other
sidewall. The
instructions have you dry-fit the cockpit tub, without sidewalls, to the
fuselage halves, use a pencil to mark the location of the sidewalls, and
then remove the tub and glue the sidewalls to the fuselage halves. What
worked for me was to glue, or temporarily tape, the rear bulkhead to the
cockpit tub and then use the open-topped box formed by the tub and rear
bulkhead to adjust the fit of the sidewalls to the tub/bulkhead combination.
The top of the sidewall should line up with the top of the tub at the front
and the top of the bulkhead at the rear. The CE tub is sized to exactly fit
between the bulkhead at the very front of the fuselage halves and the
nosewheel well attached to the underfuselage part, so if you get the
position of the sidewalls off, you may have problems later. The easy way out
is to glue the sidewalls to the tub instead of the fuselage and then put the
whole thing in as one. What I did was to put a small blob of Blu-Tac like
putty on one of the side consoles to hold the sidewall in place, put some
super glue on the back of the sidewall only, and stick the whole assembly
into one of the fuselage halves. Then, I used a paintbrush handle to push
the sidewall against the fuselage side, held it until the glue set and then
removed the tub, leaving the sidewall in place. Repeat for the other
sidewall.
-
Sanding the backs of the instrument panels to
use the acetate sheet can be a tricky undertaking. There is a fine line
between sanding enough to sand out the backs of the instruments and sanding
almost completely through the panel. You need to ensure your sanding is
uniform, especially on the upper panel as basically the entire panel
contains instruments that get sanded out. Go slow and check your work
constantly. Also, remove the panels from the sprue before sanding. I
recommend getting the backs of the instruments paper thin and translucent
and then punching through with a scalpel blade or small drill bit instead of
trying to remove the back of the instruments by sanding alone. I learned
this lesson the hard way be messing up the first panel I tried.
-
The instructions say to glue the front fuselage
halves together and then insert the completed tub from the bottom. Don't!
The tub is far bigger than either the top or bottom fuselage opening and
needs to go in before the fuselage halves go together.
Dave Williams IPMS/USA 19050
Cutting Edge Modelworks Resin Conversion
Kits and Details Sets are available at Meteor
Productions Website
Review and Image Copyright © 2000 by Dave
Williams
Page Created 26 September, 2000
Last updated 22 July, 2003
Back to HyperScale Main Page
Back to Reviews Page
|
 Home | What's
New | Features
| Gallery |
Reviews | Reference
| Forum
| Search
Home | What's
New | Features
| Gallery |
Reviews | Reference
| Forum
| Search