|
AV-8B Harrier Plus /
Night Attack
Resin Conversion and Detail
Set
AMRAAM Line
S
u m m a r y
|
| Catalogue Number
and Description: |
48-101 AV-8B Harrier Plus / Night
Attack Resin Conversion & Detail Set |
| Scale: |
1/48 |
| Contents and Media: |
23 parts in off-white resin |
| Price: |
USD$22.00 |
| Review Type: |
FirstLook, Preparation and
Test-Fitting |
| Advantages: |
Accurate and complete; options for
either Plus or Night Attack Harriers; excellent casting
quality; sharp engraved detail; clever planning of larger parts to
minimise cleanup; major variant transformation for donor kit. |
| Disadvantages: |
Major parts will require some
test-fitting, trimming and filling (ie a little initiative over and above
the instructions); some modellers may wish to scribe kit panel lines to
match engraved detail on resin parts. |
| Recommendation: |
Highly Recommended to experienced
modellers |
Reviewed by Brett Green

HyperScale is proudly sponsored by Squadron.com
AMRAAM Line produce a range of 1/48 scale accessories for
modern US and British aircraft. They have also released two conversions
for Revell-Monogram's 1/48 scale AV-8B Harrier - a Harrier Plus/Night
Attack conversion, and a Harrier GR.5/GR.7 set.
Tonight we will examine the Harrier Plus conversion. It is
somewhat surprising that this subject has not been kitted by a mainstream
kit company. The latest version of the Harrier looks very purposeful with
its new nose, additional ordnance and 100% LERX.
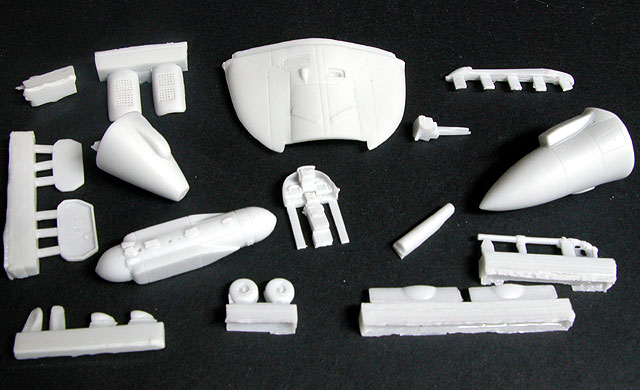
ARAAM Line's conversion comprises 23 parts in off-white
coloured resin. All the parts are perfectly cast with crisp engraved
detail. The main parts are the new 100% LERX section for the forward wing
and the two optional noses. These parts are ready to use almost straight
from the box. What appears initially to be a large casting block on the
LERX will actually slot inside the kit wing and act as reinforcement,
while the noses just need a little trimming of three smallish pour stubs.
Detail parts included in the set are:
-
extended tail spine
-
instrument panel
-
in-flight refuelling probe
-
various scoops
-
chaff and flare dispensers
-
ECM pod
-
lift fence
-
replacement outrigger wheels
These are effectively all the parts needed to build either
the Harrier Plus or the Night Attack Harrier.
Instructions are supplied on a single sheet of A4 paper.
One one side of the sheet text suggestions for construction are called out
over eight steps, with two captioned exploded view diagrams on the reverse
side. The instructions are okay, but this conversion will need some more
"tweaking" to the kit parts than the text suggests. The diagrams are a
little vague about the exact location of cutting lines. The universal rule
of "measure twice, cut once" really applies here!
Preparation and
Construction Tips
|
The conversion parts look great in the box, but I wanted
to find out how they fitted.
The AMRAAM Line conversion requires some surgery to the
kit wings and fuselage prior to assembly. Careful preparation of the kit
parts will be the key to a smooth project. As part of the review, I made
the modifications to the kit parts. Some of my observations might be
helpful to other modellers:
Tip 1: Preparation of Kit Fuselage
The kit nose must be cut off to accommodate the resin nose
for either the Night Attack or the Harrier Plus. Firstly, note that the
cuts are in different places for the different noses. I am going to build
a Harrier Plus, so I needed to make the more complex cut further back
along the nose.
Despite taking my time and using a razor saw in a mitre
box, I botched this cut. The result is that I will need to add some putty
at the top of the nose join at the front of the instrument coaming.
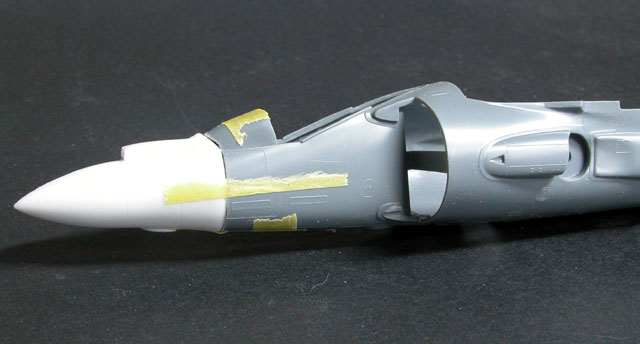
I bevelled the inside surface of the kit nose mating
surface to minimise any chance of a gap along the main join. Apart from my
poor cutting job at the top, the fit was otherwise very good.
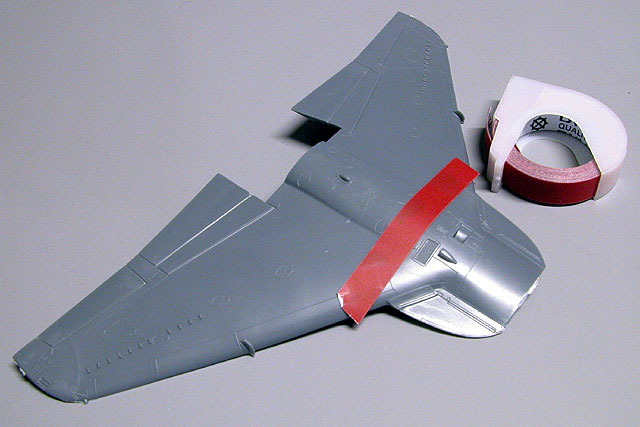
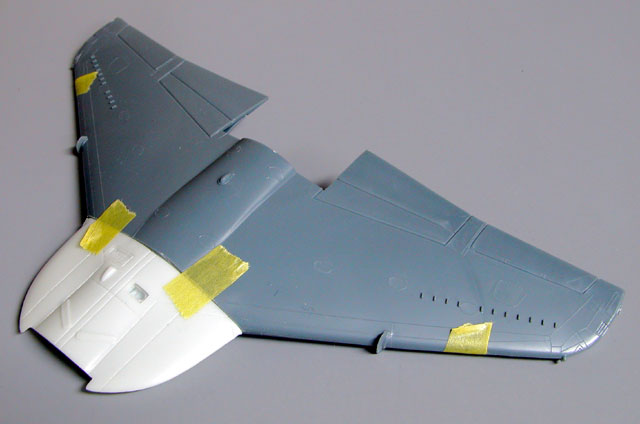
Tip 2: Preparing the Wings
I used the resin LERX as a template to determine the
cutting line on the upper wing. The line was marked with self-adhesive
Dymo tape, which acted as a guide. I scribed the line several times before
switching to a scalpel. This cut was more accurate than my attempt at the
nose!
Although the instructions do not mention it, the
preparation of the wings is not finished yet. The lower wings must also be
modified by removing the tips from the extreme inside leading edges.
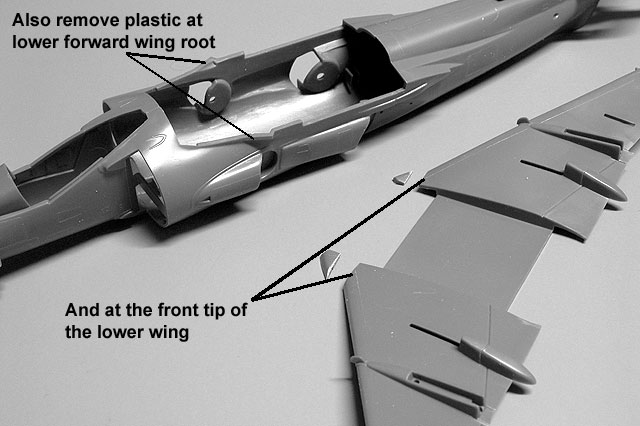
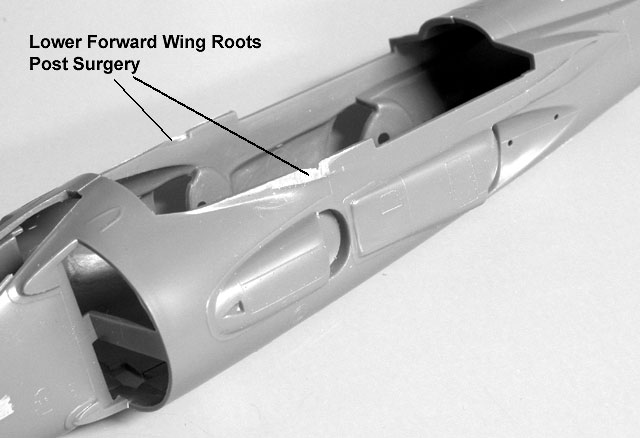
In addition, the "spurs" on the lower wing root of the
fuselage halves must be removed and smoothed.
As mentioned above, what initially appears to be a large
casting block on the LERX will actually slot inside the kit wing and act
as reinforcement. However, some plastic will have to be removed from the
leading edge of the mating surfaces of the wing to permit the resin LERX
to slot in.
It will be helpful to tape the wing halves together and
test-fit the whole wing assembly.
As an alternative to this method of preparing the wing, it
is also possible to glue the wing halves together before making the
initial cut, thus removing the excess plastic from the upper and lower
wings with a single cut.
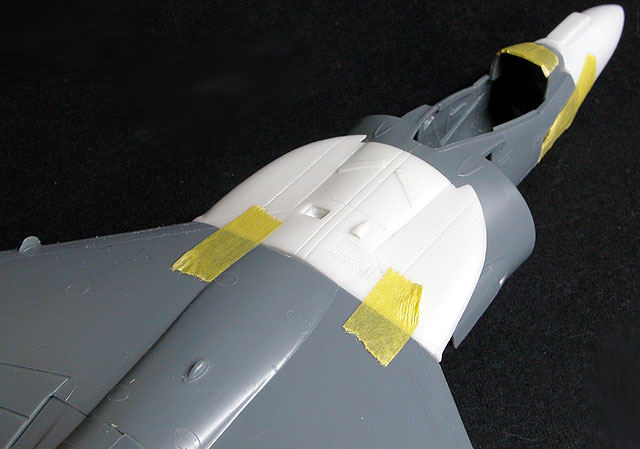
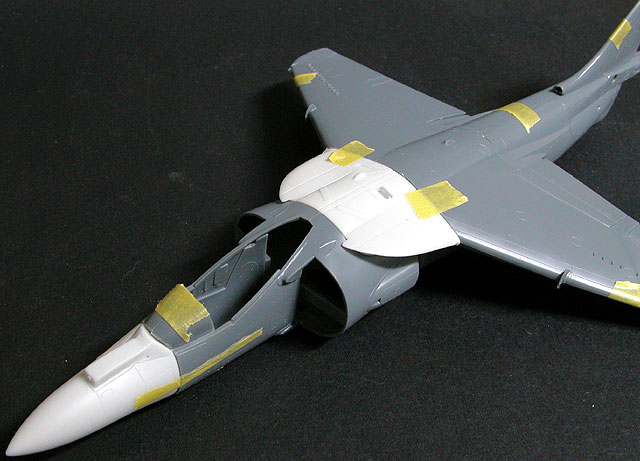
Tip 3: Final Adjustments
The resin LERX should form a "saddle" above the forward
jet nozzles. After removing the plastic from the kit fuselage sides, my
wing assembly was a gap-free, drop-fit in the top of the fuselage.
Everything Else
When you have made it this far, everything else should be
relatively simple. The only additional cutting is the spine. Check the
location of the cut carefully against your references!
AMRAAM Line's Harrier Plus / Night Attack Harrier
conversion will require plenty of care, lots of test fitting, trimming
and probably some putty to be successfully completed. Some experience
with resin conversions will be a definite advantage.
With due time and care, however, the modeller should be
rewarded with a very accurate and quite unique representation of the
ultimate American Harrier.
Highly Recommended to experienced modellers.
Thanks to Luca from AMRAAM Line for the review sample
AMRAAM Line accessories
and conversions are available
online from their
website
or enquiries may be directed to their email
address
amraamline@hotmail.com
Also check
Piero
De Santis' AV-8B Harrier Plus Construction Feature
Text and Images Copyright by
© Brett T Green
Page Created 14 October, 2002
Last updated 22 July, 2003
Back to HyperScale Main Page
Back to Reviews Page
|
 Home | What's
New | Features
| Gallery |
Reviews | Reference
| Forum
| Search
Home | What's
New | Features
| Gallery |
Reviews | Reference
| Forum
| Search