|
Polikarpov UTI-4 Soviet Trainer |
| Catalogue No.: | R8001 |
| Scale: | 1/48th |
| Media: | Resin and Multi Media (see text) |
| Review Type: | Construction |
| Rating: | Recommended for Moderately Experienced Modellers |
|
Polikarpov UTI-4 Soviet Trainer |
B a c k g r o u n d |
The Polikarpov UTI-4 was developed as a conversion trainer for the I-16 fighter. The I-16, at the time it was introduced into service, was one of the hottest fighters going. With its short fuselage and close coupled controls it was a handful to fly; especially for pilots whose only previous experience was with considerably more docile biplanes. After numerous crashes that led to the loss of aircraft as well as pilots, the need for a conversion trainer was painfully clear.
The UTI-4 was born out of this need. It was basically an I-16 with a second cockpit fitted, armament removed, and a new fuel tank. Both cockpits had a complete set of controls, and the rear cockpit was often fitted with a blind flying hood. UTI-4’s were built on every version of the I-16, though the majority were based on the type-5. At the peak of production, one in every four I-16’s was being built as an UTI-4, some 1,650 by the time production ceased.
I n t h e B o x |
Classic Resin Airframes first release is sure to be welcomed by those of us who build Soviet aircraft. The kit comes packaged in a sturdy cardboard box with a custom label. The contents are well cast in tan resin, with two sets of vacuform canopies and white metal landing gear. A nice touch is the inclusion of a custom printed Micro Scale decal sheet with a selection of star insignia on it. The fabric texture on the wing and tail surfaces is particularly well done. Unfortunately, some of the panel lines are inconsistent in their depth, but when painted they become less obvious.
The parts breakdown makes for easy assembly. The fuselage and wing are each a single piece. The tail surfaces are separate pieces from the fuselage casting.
C o n s t r u c t i o n |
The cockpit is adequately detailed, though there is still plenty of room to add additional detail if the builder so desires. The kit supplies two seats, two control sticks, and two instrument panels for the cockpit. The seats need to be modified somewhat to make them more accurate. The headrest should be removed from the seat and mounted above it on the fuselage fairing (rear seat) or on the bulkhead at the front of the rear windscreen (front seat). The instrument panels all but disappear from view when they are located in the fuselage.
The fit of the wing to the fuselage leaves a rather noticeable seam that needs to be filled. A couple applications of filler took care of this quite well. The tail surfaces fit well, and with care no putty is required to blend them in. Photos indicate an obvious transition between the fabric covered tail surfaces and the fairing that blends them into the fuselage and this is nicely captured in the kit.
The kit provides the option of two cowl fronts, one with closed cooling slats, the other with open slats. As the kit also comes with a nicely cast engine, I chose to use the cowl front with the open slats. The engine needs to be painted before installing it in the cowl, which is in turn added to the front of the fuselage. The fit of the cowling to the fuselage is okay; some putty was needed around the seam to blend it in smoothly.
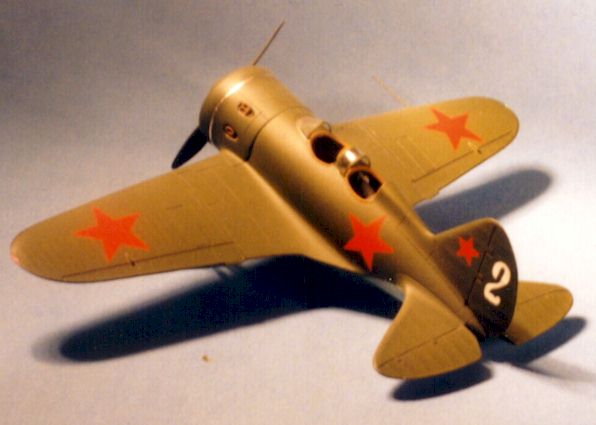
P a i n t a n d D e c a l s |
Once all the seams were attended to it was time to paint the UTI-4, any of the various schemes that were applied to the I-16 would also be appropriate for the UTI-4 as well. I chose a simple scheme that is depicted in the instructions; dark green upper surfaces over light blue under surfaces. I painted the light blue first using Aero Master Underside Blue, with Model Master Dark Green on the topsides. Once dry the model was glossed with Polly-Scale Gloss in preparation for the decals. The kit-supplied insignias were used, and proved to be of excellent quality. They were thin enough to settle down well to the surface of the model, yet opaque enough so the Dark Green did not bleed through. I added a tail number from a spare Aero Master decal sheet to complete the markings. A final over coat of Polly-Scale flat provided the final finish on the model.
While the paint and decals were drying, I worked on assembling the landing gear. The gear doors are a little too thick, so I sanded the main gear doors to reduce their thickness to something closer to scale. The retraction struts have their doors molded to them and, no matter how careful I cleaned them up, I just was not happy with their appearance. I elected to replace the retraction struts with copper wire and fashioned new doors from .015" sheet styrene. The white metal struts are very nice, and a quick rubbing with steel wool removed the mold seam as well as prepared them for painting.
F i n i s h i n g O f f |
The final assembly consisted of adding the two canopies; these fit very well, the prop and the landing gear. Because the canopy framing was so thin, I used thin strips of painted decal paper to replicate the frames. This worked well, giving me nice sharp frames. The prop was mounted to a short length of brass rod, which was inserted into a similar size hole drilled into the engine front. The landing gear was superglued into place, and my UTI-4 was ready to take its place in my display cabinet.
C o n c l u s i o n |
Overall this is a nice first effort from Classic Resin Airframes, and builders with moderate experience should have little problem building it. I hope this line will continue to grow, and bring forth other interesting subjects not seen before.
Ernie Schafer
Back to HyperScale Main Page
Back to Reviews Page